

How to Optimize Images for Faster Website Speed: A Complete Guide
Boost your website's performance by mastering image optimization techniques.
Are you tired of slow-loading web pages that send visitors running for the hills? Image optimization is your secret weapon.
Believe it or not, images are often the biggest culprit behind sluggish website performance.
Ready to unlock the power of speedy websites and keep your audience engaged? Let's dive in.
Website speed is more important than ever in today's fast world. Slow pages frustrate users. They lead to higher bounce rates and lost money. Image size is a major factor that affects website speed. Optimizing images is a key part of search engine optimization (SEO). This guide covers the best ways to optimize images. You will learn how to compress images and use responsive design. This helps you build a fast, attractive website.
Quick navigation
Why Image Optimization Matters
Why optimize images? It affects user experience and SEO. Large, unoptimized images slow down your pages. This frustrates visitors. They may leave your site. Google and other search engines use page speed as a ranking factor. A faster website ranks higher in search results. This increases your traffic. A well-optimized website improves user experience and SEO.
Do you want your website to succeed?
Choosing the Right Image Format
Choosing the right image format is very important. Different formats work best for different images. Choosing the right one can greatly reduce file size without losing quality. Here are the most common image formats:
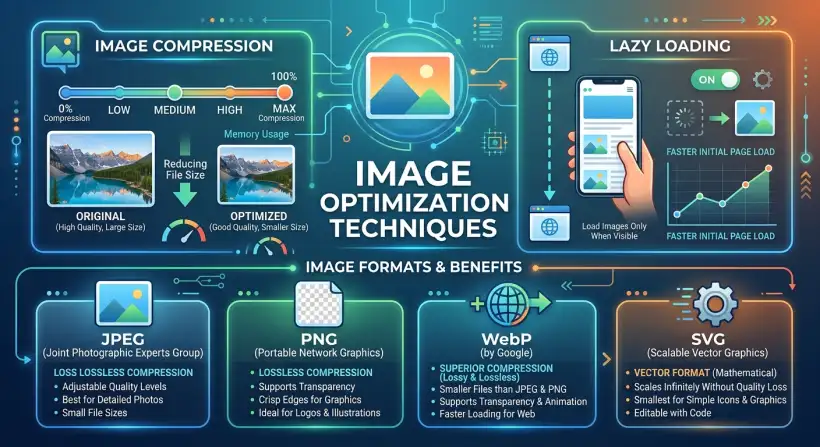
- JPEG (JPG): Best for photos and images with many colors. JPEGs use lossy compression. This means some data is removed to reduce file size. You can change the compression level to balance file size and quality.
- PNG: Good for images with text, lines, and sharp edges. PNG uses lossless compression. This means no data is lost, and image quality is kept. PNG also supports transparency.
- GIF: Good for simple animations and images with few colors. GIFs use lossless compression. They are limited to 256 colors.
- WebP: This is a modern image format from Google. It offers better compression and quality than JPEG and PNG. WebP supports both lossy and lossless compression. This makes it good for many image types.
Which format is best for you?
Image Compression Techniques
Image compression reduces an image file's size while keeping good quality. There are two main types of compression: lossy and lossless.
- Lossy Compression: This method reduces file size by removing some image data. It is often used for images where a small loss in quality is okay, like photos. JPEG is a common format that uses lossy compression.
- Lossless Compression: This method reduces file size without removing any image data. It keeps the original image quality. PNG and GIF formats use lossless compression.
You often need to try different compression levels and formats. Find the best balance between file size and image quality. The goal is to get the smallest file size without changing the way the image looks.
How can you find that perfect balance?
Implementing Responsive Images
Responsive images make sure your images look good on all devices and screen sizes. Without them, users on small devices may download large images that are scaled down. This wastes bandwidth and slows down loading. Responsive images use multiple image sizes. Use HTML attributes to tell the browser which image to show based on the device's screen size and resolution.
Here's how to use the `srcset` and `sizes` attributes in the `` tag:
<img src="image-small.jpg"
     srcset="image-small.jpg 480w,
             image-medium.jpg 768w,
             image-large.jpg 1200w"
     sizes="(max-width: 480px) 100vw,
            (max-width: 768px) 50vw,
            33vw"
     alt="Descriptive alt text">
The browser will choose the best image from the `srcset` list. It uses the screen size, as defined in the `sizes` attribute. This makes sure users on small devices download smaller images. This improves loading times. Optimizing images is a key part of creating a visually appealing website.
Lazy Loading Images
Lazy loading loads images only when they are in the user's view. This reduces the initial page load time, especially for pages with many images. Lazy loading waits to load images that are off-screen until the user scrolls to them. This improves website performance and reduces bandwidth use.
There are a few ways to use lazy loading:
- Native Lazy Loading: Use the `loading="lazy"` attribute in the `
` tag. This is the easiest method and works in most modern browsers.
- JavaScript Libraries: Use JavaScript libraries like Lazysizes or lozad.js. These offer more features and better browser compatibility.
Do you want to greatly improve your website's performance?
Tools and Plugins for Image Optimization
Many tools and plugins can help you optimize images automatically. These tools compress images, change their formats, and add responsive images and lazy loading. Here are some popular options:
- Image Compression Tools:
- TinyPNG: A web-based tool that compresses PNG and JPEG images.
- Compressor.io: Supports many image formats and offers both lossy and lossless compression.
- ShortPixel: A WordPress plugin and web service for image optimization.
- Image Optimization Plugins (WordPress):
- Smush: A popular WordPress plugin that compresses and optimizes images.
- Imagify: Another WordPress plugin with different optimization levels. It also supports WebP conversion.
What this means for you
Using image optimization techniques can greatly affect your website. Faster loading times improve user experience. This keeps visitors on your site longer. This can increase conversions, lower bounce rates, and improve your website's overall performance. Make image optimization a priority. It helps make your site faster. It also helps make it more engaging for your audience.
What are the possible results of optimizing your images?
Risks, trade-offs, and blind spots
Image optimization has benefits. However, there are also trade-offs and things to consider. Over-compressing images can lower image quality. It is important to keep a good image quality. This prevents a negative impact on user experience. Some optimization techniques need technical knowledge or third-party tools. This can add complexity or security concerns.
How can you avoid these potential pitfalls?
Main points
Optimizing images is important for improving website speed and user experience. Here is a summary of the key points:
- Choose the right image format for your images (WebP, JPEG, PNG).
- Use compression techniques to reduce file sizes (lossy and lossless).
- Use responsive images to show the correct size based on device screen size.
- Use lazy loading to delay loading off-screen images.
- Use image optimization tools and plugins to automate the process.
- Prioritize image optimization to improve SEO and user experience.
- Regularly check and update your image optimization strategy.
You can greatly improve your website's performance by using these strategies. The information in this article may help in the creation of sustainability strategies.